G-Helper Power Limits: What the 3 Sliders Actually Do
So there’s 3 sliders sitting in G-Helper’s Fans + Power section, and none of them come with an explanation attached. I’m going to go through what each of the G-Helper power limits actually caps, who they matter for, and what I’ve got mine set to on my own laptop.
Now the short version first, since some of you guys just want the answer and out — for most people these are fine left alone. Silent, Balanced and Turbo each come with their own full set of G-Helper power limits already, and the developer says as much in his own FAQ. That doesn’t help you much when you don’t know what it is you’re leaving alone though, so that’s where I’ll start.
Everything here is off my ROG Zephyrus G16 with the Ryzen AI 9 HX 370, running version 0.274.0.
What G-Helper power limits actually do
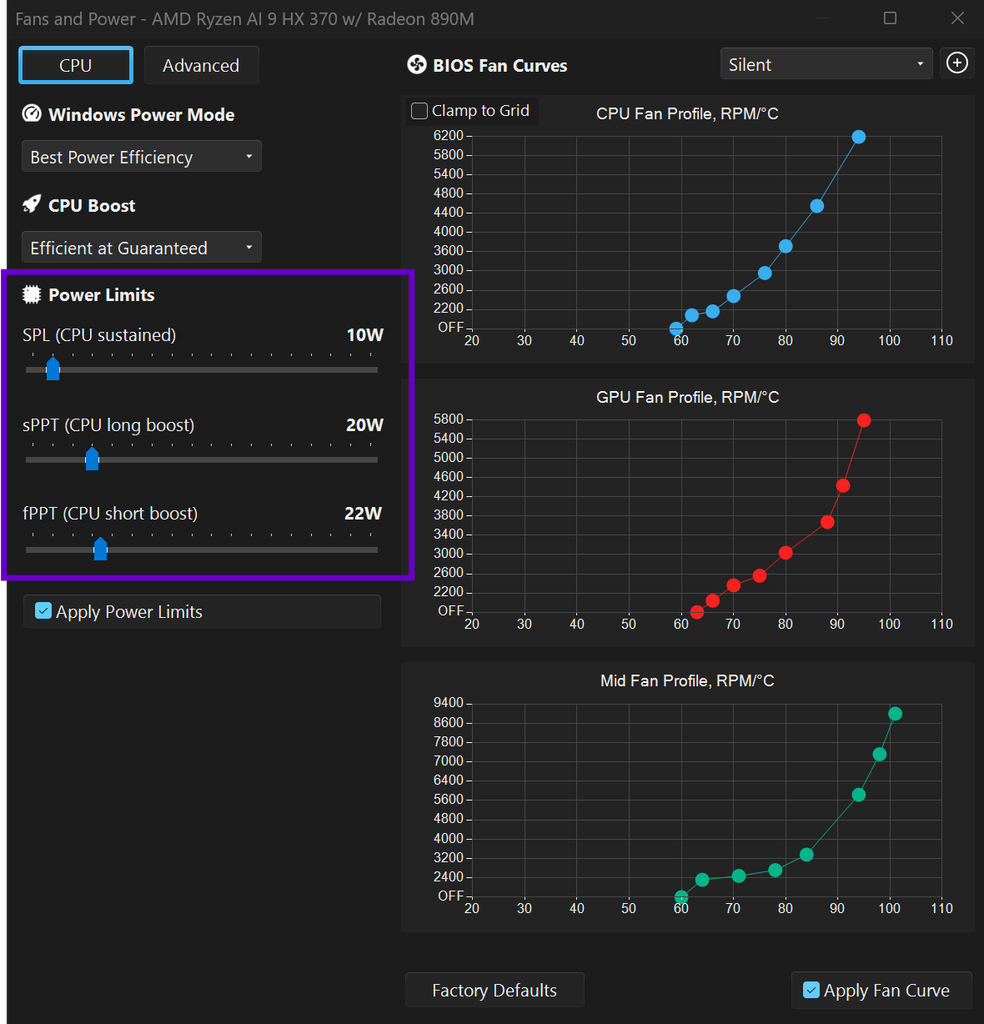
All 3 sliders cap the same thing — total power your CPU package is allowed to pull. The difference between them is how long each cap applies for.
Now the reason there’s 3 of them instead of 1 comes down to a problem you’d hit with a single number. Set one cap low and every short burst gets strangled, so opening a folder or loading a tab feels sluggish even though the chip is nowhere near its thermal limit. Set one cap high and there’s nothing stopping a 40-minute export from running at full burst power until your laptop cooks itself. Splitting the cap across 3 time windows lets short spikes run hard while the long-term average stays inside what your heatsink can actually move.
G-Helper isn’t enforcing any of these itself, by the way. It writes the values through the ASUS interface and your firmware decides what to do with them. Same deal as the fan curves — G-Helper asks, firmware answers.
SPL — the G-Helper sustained power limit
The long-term average, measured over tens of seconds up to minutes. This is the one that decides where your CPU settles during anything that runs for a while: gaming, compiling, rendering, a long export.
If you only ever touch 1 slider, the G-Helper sustained power limit is the one. SPL is your actual performance ceiling for real work.
sPPT — CPU long boost
The medium window, roughly tens of seconds. It sits above SPL and covers stuff that’s too long to count as a spike but too short for the sustained average to catch up — level loads, big file operations, launching something heavy.
fPPT — CPU short boost
Milliseconds up to a second or 2. This is how hard your chip is allowed to slam the instant you click something. It’s the slider that decides whether the laptop feels snappy, and it has almost nothing to do with performance in a long workload.
Worth not mixing this up with the CPU Boost modes, which decide how eagerly your chip reaches for clock speed rather than how much power it’s allowed to use getting there. Two separate settings that both end up deciding your clock speed, just from different directions.
| Slider | Time window | What it controls | Raise it to |
|---|---|---|---|
| SPL | Tens of seconds to minutes | Sustained performance | Get more FPS / faster renders |
| sPPT | Tens of seconds | Medium bursts, loading | Smooth out load stutters |
| fPPT | Milliseconds to ~2s | Instant responsiveness | Make the system feel snappier |
One rule worth knowing: they have to stay in order. SPL can’t be higher than sPPT, and sPPT can’t be higher than fPPT. If you drag one past another, the others move with it.
What should you set your G-Helper CPU power limits to?
Honestly? Whatever your mode already has.
Here’s the thing that took me way too long to figure out — Silent, Balanced and Turbo aren’t just fan curve presets. Each one carries its own full set of G-Helper CPU power limits, and switching modes swaps all 3 sliders at once. So when you click Silent, you’re already applying a much lower sustained cap. You didn’t need to touch anything. These are the same firmware modes Armoury Crate switches, and I benchmarked Silent, Performance and Turbo in my Armoury Crate operating mode test. If you’d rather set the same 3 limits inside ASUS’s own app, I tested that in my Armoury Crate Manual Mode guide.
The G-Helper FAQ puts it bluntly: you don’t have to apply custom limits at all, it’s purely optional, and the built-in BIOS modes work well. Only start dragging sliders if you’re chasing something specific, like getting temps down.
So the actual decision is short. Pick Silent when you want quiet and battery. Pick Balanced for normal use. Pick Turbo when you’re gaming or plugged in and pushing the thing. Only open that panel if one of those 3 isn’t giving you what you want, and then change the slider that matches your problem — SPL if sustained performance is wrong, fPPT if the machine feels laggy on click. If you want the full picture across every setting rather than just power, my best G-Helper settings guide covers the rest of them.
What lowering your G-Helper power limits actually gets you
Now if you do want a reason to go in there, it comes down to one thing — less power going into the chip means less heat coming out of it. Everything below is downstream of that.
Battery life. Sustained draw is the bulk of what kills your charge during normal work, and SPL is the slider that controls it directly. A lower sustained cap means the chip physically can’t sit high for long stretches, no matter what Windows decides it wants to do. For a rough sense of the spread on my machine, sitting in Turbo on battery had me pulling 21.7W discharge, while my battery profile gets me down to around 13W.
Heat and fan noise. This is the one the G-Helper FAQ actually recommends the sliders for. Less package power means less heat to move, which means your fans don’t have to ramp as hard to keep up. If your laptop gets loud during nothing in particular, capping power gets you further than fighting it with a custom fan curve, since you’re removing the heat instead of chasing it.
Keeping things predictable. This is honestly my own reason. A tight cap stops the wattage from jumping all over the place when I’m on battery in class, so the laptop behaves the same way for the whole lecture instead of spiking every time something loads in the background.
Here’s the catch though — you’re paying for all of that with sustained performance. Drop SPL and long workloads genuinely get slower, because that’s the exact thing you just capped. So this is worth doing if you’re on battery a lot, carrying the thing around, or sick of fan noise. If you’re plugged in at a desk and gaming, you’re giving up frames for a benefit you don’t need. If you want the heat savings without that performance hit, that’s what an undervolt does instead, since it lowers voltage at the same clock speed, and I went through finding a safe value in my G-Helper undervolt guide.
How to apply power limits in G-Helper
If you do want to change them, this part trips people up because the sliders don’t do anything on their own.
- Open the main G-Helper window and pick the mode you want to edit — Silent, Balanced or Turbo. Whichever one is active is the one you’re about to change.
- Click Fans + Power in that same row.
- Scroll down to Power Limits and drag your sliders.
- Check the Apply Power Limits checkbox.
- Check Apply Fan Curve at the bottom right. Despite the name, this is what actually commits your changes.
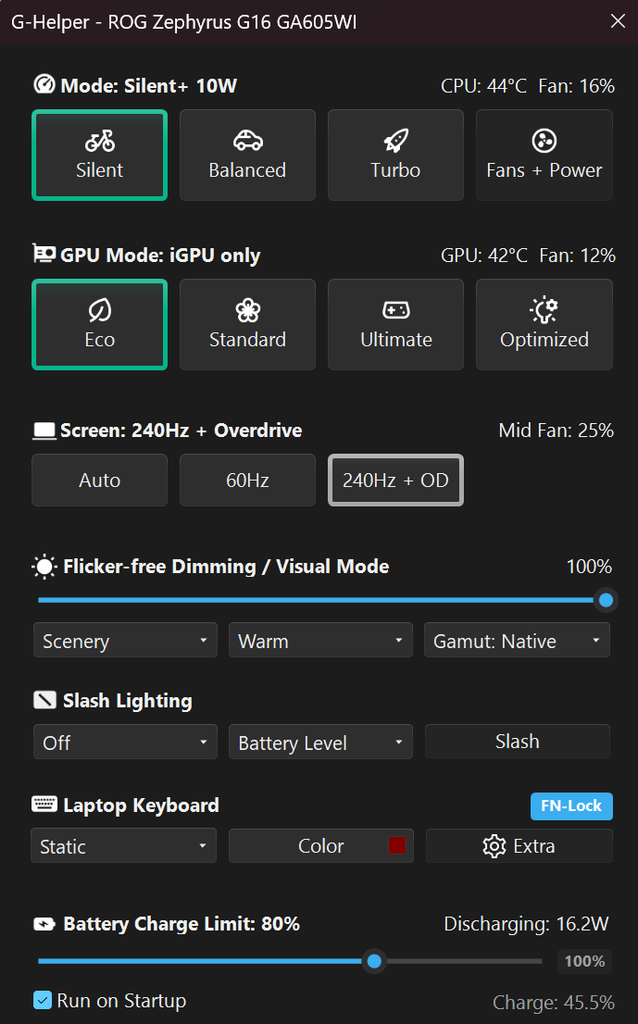
Skip step 4 and your numbers sit there looking applied while nothing happens. Skip step 5 and nothing saves at all.
One warning before you apply power limits in G-Helper: the moment you check Apply Fan Curve, your BIOS starts treating your fan curve as “custom” whether or not you touched it. That’s straight out of the G-Helper FAQ and it catches people off guard, because suddenly their fans behave differently and they blame the power limits for it.
The G-Helper power limits checkbox is per mode, not global
This one isn’t in the FAQ or the docs, and it explains a lot of confusion.
That Apply Power Limits checkbox isn’t a single setting for the whole app. Each mode stores its own. You can have it on for Turbo and off for Balanced, and you’d never know from the UI unless you switched modes and looked again. So you have to apply power limits in G-Helper separately for every mode you actually care about.

I found this in my own config file rather than the UI. G-Helper stores everything at %AppData%\GHelper\config.json, which the power user settings docs cover in more depth, and the entries are suffixed by mode — _0 is Balanced, _1 is Turbo, _2 is Silent. Mine has the apply flag on for Turbo and Silent, and off for Balanced. So 2 of my 3 modes are actively enforcing limits and 1 isn’t, which I had no idea about until I opened that file.
If your G-Helper power limits work in one mode and not another, that’s your answer right there.
My G-Helper power limits on the Zephyrus G16
These are my current values on a GA605WI with the Ryzen AI 9 HX 370. Not stock defaults — just what my machine is running day to day.
| Mode | SPL | sPPT | fPPT |
|---|---|---|---|
| Silent | 10W | 20W | 22W |
| Balanced | 20W | 30W | 30W |
| Turbo | 20W | 90W | 90W |
A few things jump out of that table.
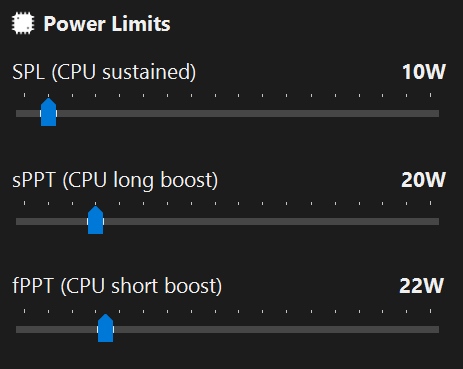
Silent keeps the boost window tiny. 20W long boost, 22W short boost — 2W of separation. That’s the chip being allowed to respond to a click without ever really opening up. Paired with a 10W sustained cap, it’s why Silent feels perfectly fine for browsing and notes but falls apart the second you ask it to do something sustained.
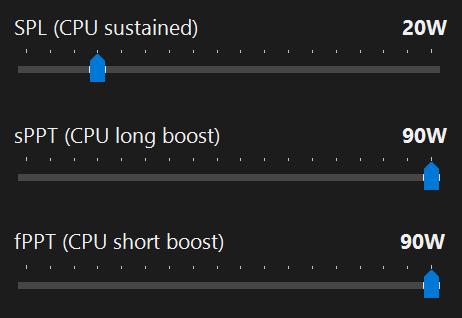
Balanced and Turbo have the same SPL. Both 20W. The only thing Turbo changes for me is the boost ceiling, which goes from 30W to 90W. So on my setup, switching to Turbo doesn’t raise what the chip holds during a long load at all — it widens how hard it’s allowed to spike getting there.
sPPT and fPPT are identical on both Balanced and Turbo. Only Silent keeps them apart. Which means on my Balanced and Turbo profiles, the short boost slider isn’t doing anything independent — there’s one boost ceiling sitting under 2 different names.
Worth saying plainly: I didn’t arrive at these through benchmarking. I picked Silent’s numbers low enough that basic work still feels completely normal, and left it there. That’s it, no 40-hour testing spreadsheet behind it. These are also only the G-Helper CPU power limits. The GPU is a separate story, and on battery the biggest GPU lever isn’t a slider at all, it’s which mode you’re in, which I measured in my G-Helper GPU mode guide.
I also checked Turbo plugged in versus on battery and the limits came back identical either way. So on this machine the charger doesn’t buy you a higher ceiling, it just lets you hold boost without watching your battery drop.
G-Helper power limits not working? Start here
Most reports of G-Helper power limits not working come down to 1 of these.
- The Apply Power Limits box is off for that mode. Covered above, and it’s the most common one. Check it in the specific mode you’re in, not just the one you last edited.
- Apply Fan Curve isn’t checked. The sliders and the Apply Power Limits box are both inert until you check Apply Fan Curve at the bottom of Fans + Power.
- ASUS services are overwriting them. If you’ve still got Armoury Crate services running, they can stomp on whatever G-Helper sets. Kill them from Extra, then Stop services.
- They don’t survive a reboot on their own. Your BIOS wipes them at every restart and G-Helper reapplies them on startup, which is the same pattern as the battery charge limit. So this only becomes a problem if the app isn’t set to run on startup — there’s a checkbox for that at the bottom of the main window, and I covered it in the setup guide.
- Your model might not support custom limits. Older and more basic ASUS laptops don’t expose them at all. If ASUS’s own software never let you set custom values, G-Helper won’t either.
- SPL isn’t a hard wall. There’s a documented case on the G-Helper GitHub of a user on a Ryzen 7 6800H setting SPL to 25W and watching his CPU sit at 40W anyway — the sustained limit held for a few seconds to a few minutes, then drifted up and never came back down. If your chip is blowing past SPL under load, you’re not doing anything wrong. That’s firmware deciding it knows better than you.
If the app itself is the thing misbehaving rather than the limits, I went through the 3 most common ones separately in G-Helper not working.
FAQ
What are SPL, sPPT and fPPT in G-Helper?
3 power caps on your CPU covering different lengths of time. SPL is the sustained average over minutes, sPPT covers medium bursts over tens of seconds, and fPPT covers millisecond spikes when you click something.
What should I set my G-Helper power limits to?
For most people, nothing. Each performance mode already carries its own set of values, so picking Silent, Balanced or Turbo is the real decision. Only change the sliders if a specific mode isn’t giving you what you want.
Why are my G-Helper power limits not working?
Usually because the Apply Power Limits checkbox is off for that particular mode, since it’s stored per mode rather than globally. The other causes are Apply Fan Curve not being checked, ASUS services overwriting the values, or a model that doesn’t support custom limits at all.
Do G-Helper power limits survive a restart?
The BIOS resets them on every boot, but G-Helper reapplies them when it starts. As long as the app is set to run on startup, your values come back on their own.
Is it safe to change power limits in G-Helper?
Lowering them is — you’re capping how much power the chip can draw, which reduces heat. Raising them above stock puts more thermal load on your cooling, so that’s the direction to be careful in. I went into what the app does to your laptop more broadly in is G-Helper safe.